Hexo基础进阶设置,2024版
在上篇我们搭建了一个很基础的网站,这次来看看我个人有哪些在2024年要做的配置吧。
事实上,在原文档,以及博主lijunliang的文章里已经有了非常详细的说明,想必也比我这个门外汉再写一份来的更清晰易懂。
但是这些文章也许有些年头了,有些地方在2024年可能需要额外的配置,这篇文章会简单介绍我做的改动。
1,代码块highlight
在原文说明highlight代码块的地方,原文如下
Starting from Hexo 5.0.0 version, it comes with support for
prismjscode syntax highlighting, and hexo-theme-matery has been modified to support it.If the plugin of
hexo-prism-pluginhas been installed in your blog, then you need to executenpm uninstall hexo-prism-pluginto uninstall it, otherwise there will be{,}escape characters in the code block of the post.Then, modify the value of
highlight.enabletofalsein_config.ymlat the root your hexo project, and set the value ofprismjs.enabletotrue, the main configuration is as follows:>highlight: enable: false line_number: true auto_detect: false tab_replace: '' wrap: true hljs: false >prismjs: enable: true preprocess: true line_number: true tab_replace: ''
然而实际情况是,在2024年Hexo已经到了7+版本(cmd 输入hexo -v查看版本)。在官方文档中,新增了syntax_highlighter: highlight.js配置,所以在此基础上,需要将根目录的_config.yml文件highlight处更改为:
syntax_highlighter: prismjs #声明prismjs来启用
highlight:
  enable: false
  line_number: true
  auto_detect: false
  tab_replace: ''
  wrap: true
  hljs: false
prismjs:
  enable: true
  preprocess: true
  line_number: true
  tab_replace: ''
前后效果如下:

2, 代码压缩
在此文章里,作者使用Gulp实现了代码和图片的压缩从而提升网站速度。但是早在2022年后,有一些commonJS的package完全移到了ESM里。例如原commonJS里的del v7.0.0,不在同时支持commonJS和ESM,而仅支持ESM,原文如下:
The package that linked you here is now pure ESM. It cannot be
require()‘d from CommonJS.
对于这些ESM的包,需要使用import()而不是require()。
因此,需要在原教程基础下,做额外几步:
2.1, 安装esm
npm install gulp -g #安装gulp

# 安装功能模块
npm install gulp-htmlclean gulp-htmlmin gulp-minify-css gulp-uglify gulp-imagemin --save

# 额外的功能模块 npm install gulp-debug gulp-clean-css gulp-changed gulp-if gulp-plumber gulp-babel babel-preset-es2015 del --save

npm i --save-dev esm -g #新增,安装esm并将文件名gulpfile.js更改为gulpfile.mjs
2.2, 将require()变更为import()
在gulpfile.js最开头,将所有require的地方改为import xxx from 'gulp-xxx'
更改前
>var gulp = require("gulp");
>var debug = require("gulp-debug");
>var cleancss = require("gulp-clean-css"); //css压缩组件
>var uglify = require("gulp-uglify"); //js压缩组件
>var htmlmin = require("gulp-htmlmin"); //html压缩组件
>var htmlclean = require("gulp-htmlclean"); //html清理组件
>var imagemin = require("gulp-imagemin"); //图片压缩组件
>var changed = require("gulp-changed"); //文件更改校验组件
>var gulpif = require("gulp-if"); //任务 帮助调用组件
>var plumber = require("gulp-plumber"); //容错组件(发生错误不跳出任务,并报出错误内容)
>var isScriptAll = true; //是否处理所有文件,(true|处理所有文件)(false|只处理有更改的文件)
>var isDebug = true; //是否调试显示 编译通过的文件
>var gulpBabel = require("gulp-babel");
>var es2015Preset = require("babel-preset-es2015");
>var del = require("del");
>var Hexo = require("hexo");
>来源: Marmalade's Blog
>文章作者: lijunliang
>文章链接: https://marmalade.vip/Materysettings2.html
>本文章著作权归作者所有,任何形式的转载都请注明出处。
更改后
import gulp from 'gulp';
import debug from 'gulp-debug';
import cleancss from 'gulp-clean-css';
import uglify from 'gulp-uglify';
import htmlmin from 'gulp-htmlmin';
import htmlclean from 'gulp-htmlclean';
import imagemin from 'gulp-imagemin';
import changed from 'gulp-changed';
import gulpif from 'gulp-if';
import plumber from 'gulp-plumber';
import gulpBabel from 'gulp-babel';
import es2015Preset from 'babel-preset-es2015';
import { deleteAsync } from 'del';
import Hexo from 'hexo';
其余部分保持不变。
2.3,部署前启动Gulp压缩
原先部署网页到github的步骤为
hexo clean
hexo g
hexo d
现在为
hexo clean
hexo g
gulp #启动Gulp压缩,控制台可查看错误信息
hexo d
3, 中英文个人网页
这个需求到现在没有一个通解。在hexo提供了一种叫Internationalization (i18n)的解决方案,其本质就是在source文件里分别创建两个语言的文件夹,然后再把文章放入相应的文件夹中。然而,但实际操作起来的过程中,尤其在应用预设theme的时候,会遇上种种困难。有些主题,例如在NexT里已经适配好了语言转换的功能。不幸的是,本文用的matery似乎没有这个功能。当然,大神们可以通过魔改实现功能。但是有没有更简单更傻瓜的办法呢?
0,当然是直接右键谷歌翻译成英文咯(误)
3.1, 初步设想
那必须是有的,其实我们想要的无外乎就是一套不同的界面,那么是不是可以理解为,主界面就是中文,然后在网址加上一个例如/en的后缀,转跳到英文界面。
换句话说,我们直接建立两个仓库,实现两个网址间的相互转跳就好了。
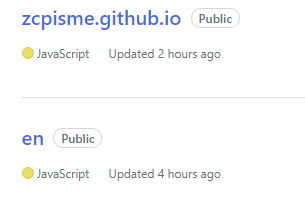
很幸运,github的个人网址里,虽然只能一个账户只能有一个免费用户页面(user site),但是页面却可以有很多个项目页面(project site)。
例如,https://zcpisme.github.io/是我的用户页面, 而我有一个项目叫myProject,这个项目的网址就是https://zcpisme.github.io/myProject
3.2, 第二个仓库
这就简单了,我们把中文网址的项目文件夹复制一份,重新命名(随意命名,但方便起见我会直接叫myFirstBlog.en)。
在github上新建一个repository,名为en。结果如下:
3.3.1, 更改myFirstBlog.en文件夹下配置文件
根目录下的_config.yml
# Site
title: Hexo
subtitle: ''
language: en #改为en

# URL
## Set your site url here. For example, if you use GitHub Page, set url as 'https://username.github.io/project'
url: https://zcpisme.github.io/en/  #在原基础上加上en
# Deployment
## Docs: https://hexo.io/docs/one-command-deployment
deploy:
type: git
repo: https://github.com/zcpisme/en.git #en网页仓库地址
branch: gh-pages #推送到gh-pagestheme文件里的_config.yml,加一个按钮超链接到中文页面
menu:
  Index:
    url: /
    icon: fas fa-home
  Tags:
    url: /tags
    icon: fas fa-tags
  Categories:
    url: /categories
    icon: fas fa-bookmark
  Archives:
    url: /archives
    icon: fas fa-archive
  About:
    url: /about
    icon: fas fa-user-circle
  #粗暴的加一个中文按钮
  中文:
    url: https://zcpisme.github.io/  #直接转跳到中文站
    icon: fas fa-language
3.3.2, 更改myFirstBlog文件夹下配置文件
根目录下的_config.yml
# Site
title: Hexo
subtitle: ''
language: zh-CN #改为中文
同理,我们只需要在theme里的_config.yml加一个按钮到英文站就好了
menu:
  Index:
    url: /
    icon: fas fa-home
  Tags:
    url: /tags
    icon: fas fa-tags
  Categories:
    url: /categories
    icon: fas fa-bookmark
  Archives:
    url: /archives
    icon: fas fa-archive
  About:
    url: /about
    icon: fas fa-user-circle
  #粗暴的加一个中文按钮
  English:
    url: /en  #可以完整的写上https://zcpisme.github.io/en
    icon: fas fa-language
3.4, 效果
分别上传的两个仓库,等待片刻,便可以查看网址,效果如下:
中文站:

英文站:

3.5 ,缺点
缺点是显而易见的,
两个仓库需要分别维护,这太麻烦了。
文章内容需要单独准备,因为这只是翻译了主界面,文章内容依旧需要自行翻译上传。
部分代码依旧需要改动,以适配英文页面。例如
……
4,小总结一下
这里处理了一些原文档已经过时的教程,也简单说了一下我个人对于语言切换的一些想法,如果有更好的办法请务必告知我!很想学习捏