Advanced Hexo Setup Tips, 2024 Edition
Translated by ChatGPT
In the previous article, we built a very basic website. This time, let’s take a look at some personal configurations I plan to make in 2024.
In fact, the original documentation and blogger lijunliang‘s articles have already provided very detailed instructions, which are likely clearer and easier to understand than what an outsider like me could write.
However, these articles might be a bit dated, and some additional configurations may be necessary in 2024. This article will briefly introduce the changes I’ve made.
1. Code Block Highlighting
In the original documentation regarding highlighting code blocks, it states:
Starting from Hexo 5.0.0 version, it comes with support for
prismjscode syntax highlighting, and hexo-theme-matery has been modified to support it.If the plugin of
hexo-prism-pluginhas been installed in your blog, then you need to executenpm uninstall hexo-prism-pluginto uninstall it, otherwise there will be{,}escape characters in the code block of the post.Then, modify the value of
highlight.enabletofalsein_config.ymlat the root your hexo project, and set the value ofprismjs.enabletotrue, the main configuration is as follows:>highlight: enable: false line_number: true auto_detect: false tab_replace: '' wrap: true hljs: false >prismjs: enable: true preprocess: true line_number: true tab_replace: ''
However, the actual situation is that, by 2024, Hexo has reached version 7+ (check the version with hexo -v in cmd). In the official documentation, a new syntax_highlighter: highlight.js configuration has been added, so based on this, you need to change the highlight section in the root directory’s _config.yml file to:
syntax_highlighter: prismjs #declare prismjs
highlight:
  enable: false
  line_number: true
  auto_detect: false
  tab_replace: ''
  wrap: true
  hljs: false
prismjs:
  enable: true
  preprocess: true
  line_number: true
  tab_replace: ''
The before and after effects are as follows:

2. Code Compression
In this article, the author uses Gulp to compress code and images to speed up the website. However, since 2022, some commonJS packages have moved entirely to ESM. For example, del v7.0.0 in the original commonJS no longer supports commonJS and ESM simultaneously but supports ESM only, as stated in the original text:
The package that linked you here is now pure ESM. It cannot be
require()‘d from CommonJS.
For these ESM packages, you need to use import() instead of require().
Therefore, a few additional steps are needed based on the original tutorial:
2.1, Installing esm
npm install gulp -g # Install gulp

# Install functional modules
npm install gulp-htmlclean gulp-htmlmin gulp-minify-css gulp-uglify gulp-imagemin --save

# Additional functional modules npm install gulp-debug gulp-clean-css gulp-changed gulp-if gulp-plumber gulp-babel babel-preset-es2015 del --save

npm i --save-dev esm -g # New, install esm
And rename the file gulpfile.js to gulpfile.mjs
2.2, Changing require() to import()
At the beginning of gulpfile.js, change all instances of require to import xxx from 'gulp-xxx'
Before change
>var gulp = require("gulp");
>var debug = require("gulp-debug");
>var cleancss = require("gulp-clean-css"); // CSS compression component
>var uglify = require("gulp-uglify"); // JS compression component
>var htmlmin = require("gulp-htmlmin"); // HTML compression component
>var htmlclean = require("gulp-htmlclean"); // HTML cleaning component
>var imagemin = require("gulp-imagemin"); // Image compression component
>var changed = require("gulp-changed"); // File change verification component
>var gulpif = require("gulp-if"); // Task helper calling component
>var plumber = require("gulp-plumber"); // Fault tolerance component (continue task on error and report error content)
>var isScriptAll = true; // Whether to process all files, (true|process all files)(false|only process changed files)
>var isDebug = true; // Whether to debug display compiled files
>var gulpBabel = require("gulp-babel");
>var es2015Preset = require("babel-preset-es2015");
>var del = require("del");
>var Hexo = require("hexo");
>Source: Marmalade's Blog
>Author: lijunliang
>Article link: https://marmalade.vip/Materysettings2.html
>This article is copyrighted by the author, any form of reprinting should cite the source.
After change
import gulp from 'gulp';
import debug from 'gulp-debug';
import cleancss from 'gulp-clean-css';
import uglify from 'gulp-uglify';
import htmlmin from 'gulp-htmlmin';
import htmlclean from 'gulp-htmlclean';
import imagemin from 'gulp-imagemin';
import changed from 'gulp-changed';
import gulpif from 'gulp-if';
import plumber from 'gulp-plumber';
import gulpBabel from 'gulp-babel';
import es2015Preset from 'babel-preset-es2015';
import { deleteAsync } from 'del';
import Hexo from 'hexo';
Keep the rest unchanged.
2.3, Starting Gulp Compression Before Deployment
The original steps for deploying the webpage to GitHub were:
hexo clean
hexo g
hexo d
Now it is:
hexo clean
hexo g
gulp # Start Gulp compression, console can check for errors
hexo d
3. Bilingual Personal Website
This requirement has not yet found a universal solution. Hexo provides a solution called Internationalization (i18n), which essentially involves creating separate folders for two languages in the source file and then placing articles in the corresponding folders. However, in practice, especially when applying a preset theme, various difficulties may arise. Some themes, such as NexT, have already adapted the feature for language switching. Unfortunately, the matery theme used in this article does not seem to have this feature. Of course, experts can achieve this function by modifying the code. But is there a simpler way?
3.1, Preliminary Idea
Of course, there is. Essentially, what we want is a set of different interfaces, so it can be understood that the main interface is in Chinese, and then by adding a suffix like /en to the URL, it jumps to the English interface.
In other words, we can directly create two repositories to implement the mutual jump between the two URLs.
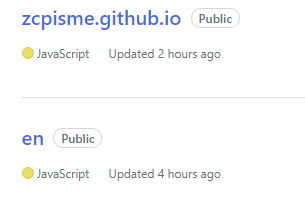
Fortunately, in GitHub’s personal URLs, although an account can only have one free user page, there can be many project pages.
For example, https://zcpisme.github.io/ is my user page, and if I have a project called myProject, the URL of this project would be https://zcpisme.github.io/myProject
3.2, The Second Repository
This is simple. We copy the project folder of the Chinese website, rename it (arbitrarily named, but for convenience, I will call it myFirstBlog.en).
Create a new repository on GitHub, named en. The result is as follows:
3.3.1, Modify the Configuration Files in the myFirstBlog.en Folder
In the root directory’s _config.yml:
# Site
title: Hexo
subtitle: ''
language: en # Change to en

# URL
## Set your site url here. For example, if you use GitHub Page, set url as 'https://username.github.io/project'
url: https://zcpisme.github.io/en/  # Add en to the original basis
# Deployment
## Docs: https://hexo.io/docs/one-command-deployment
deploy:
type: git
repo: https://github.com/zcpisme/en.git # Repository address for the en webpage
branch: gh-pages # Push to gh-pagesIn the theme’s _config.yml, add a button hyperlink to the Chinese page:
menu:
  Index:
    url: /
    icon: fas fa-home
  Tags:
    url: /tags
    icon: fas fa-tags
  Categories:
    url: /categories
    icon: fas fa-bookmark
  Archives:
    url: /archives
    icon: fas fa-archive
  About:
    url: /about
    icon: fas fa-user-circle
  # add a Chinese button
  Chinese:
    url: https://zcpisme.github.io/  # Directly jump to the Chinese site
    icon: fas fa-language
3.3.2, Modify the Configuration Files in the myFirstBlog Folder
In the root directory’s _config.yml:
# Site
title: Hexo
subtitle: ''
language: zh-CN # Change to Chinese
Similarly, we just need to add a button to the English site in the theme’s _config.yml:
menu:
  Index:
    url: /
    icon: fas fa-home
  Tags:
    url: /tags
    icon: fas fa-tags
  Categories:
    url: /categories
    icon: fas fa-bookmark
  Archives:
    url: /archives
    icon: fas fa-archive
  About:
    url: /about
    icon: fas fa-user-circle
  # add an English button
  English:
    url: /en  # Can fully write https://zcpisme.github.io/en
    icon: fas fa-language
3.4, Effect
After uploading to the two repositories and waiting a moment, you can check the URLs, the effect is as follows:
Chinese site:

English site:

3.5, Disadvantages
The disadvantages are obvious:
Two repositories need to be maintained separately, which is too troublesome.
Article content needs to be prepared separately because this only translates the main interface, the content of the articles still needs to be translated and uploaded individually.
Some code still needs to be modified to adapt to the English page. For example,

……
4, A Brief Summary
Here, I’ve dealt with some outdated tutorials from the original document and briefly mentioned some of my personal ideas about language switching. If there is a better way, please let me know! I’m eager to learn.